About ten months ago I was watching an episode of Techlinked, a couple times a week news show on YouTube, in which the host made a joke about having an AI create images using blocks in Minecraft. It was with this that I was inspired to create my own plugin and server to host it, where it would take in suggestions and use AI to generate pixel art of the image. The purpose of DalleMC is to do exactly this.
How it Works:
Click the image for a YouTube demonstration
DalleMC is the plugin to manage it, and I currently host it on my personal server (dallemc.dylan.sh - probably online right now!). DalleMC collects suggestions, allows you to vote on them, and after a certain amount of time a winner is picked. The winning suggestion is then generated in the form of minecraft blocks below.
There are three commands, /suggest <prompt> which makes a suggestion, /listsuggestions which shows the suggestions and how many votes it has, and /vote <prompt> which allows you to vote on the suggestion you want to see.
The DalleMC server currently generates the image in a 256x256 grid below the players.
Development:
UML Class Diagram
Because Minecraft is Java and all plugins are exclusively Java, this was written almost entirely in Java. At the time I started development, I was really interested in DALL-E Mini, a model very similar to the DALLE·2 model, but at a fraction of the size. I was initially going to use this to handle AI image generation, but unfortunately it made things complicated as my current hardware isn’t optimized for GPU intensive workloads. Luckily I received API access for DALLE·2, and decided to use that instead.
DalleMC consists of eight classes and one Python script. Essentially, there’s a main class that actually runs the plugin, and it calls the other ones for various tasks.
When the voting cycle starts, the ‘Main’ class uses ‘SuggestionDB’ and ‘VoteRecords’ to create two databases for who has voted/suggested, and what they’ve voted/suggested. The timing and voting cycle is all handled via a scheduled repeating task, with adjustibility if needed. ‘SuggestionDB’ and ‘VoteRecords’ are essentially just objects with maps and getters/setters for access and manipulation.
In Spigot, plugins have separate classes for commands, so ‘CommandVote’ and ‘CommandSuggest’ are used to make a suggestion and to vote on the desired suggestion. These two classes can be called by players, and they utilize ‘SuggestionDB’ and ‘VoteRecords’ to make sure that a player cannot submit multiple suggestions/votes, and to track who voted. There is an additional class, ‘CommandListSuggestions’, that serves the purpose of listing suggestions and how many votes it has, utilizing SuggestionDB to do so.
When a suggestion is determined to be the winner, it will call the ‘ImageGeneration’ class to generate the image. This class passes in parameters to a Python script that calls the OpenAI API, receives the URL to the generated 256x256 image, and downloads it to the relevant folder. Because this project relies on a modified version of Pixelator (.png to Minecraft blocks converter), the Python script saves it to the input folder for that plugin. In the event that the suggestion breaks OpenAI’s content rules, or it has an error generating, ‘ImageGeneration’ will broadcast this and describe the error in the console.
‘ImageGeneration’ relies on an API key, and because I would be a fool to hardcode that in, I have included the ‘ConfigParser’ class as a way to take in the OpenAI API key from a ‘config.txt’ file located in the “DalleMC” folder adjacent to the plugin jar file. ‘ConfigParser’ reads this after being called in the main class, and is not included in the repeating task.
After generating the image, the ‘Main’ class broadcasts the winner with the number of votes and who suggested it. It then calls Pixelator to generate the image, and Pixelator does so. Because Pixelator was created to be executed by a player and generated directly at the players location, I had to modify it for my use case. A simple fork and command modification to take in x, y, z coordinates, as well as making it executable by console, was all I needed. ‘ImageGeneration’ sends the command to the console with the coordinates,and out it goes.
Limitations:
DalleMC was created for my personal use, and while anyone could use it, I doubt anyone will. Because of this, a lot of aspects have been hardcoded in. I could have used the ‘ConfigParser’ class to take in a bunch of different aspects, but in the interest of time and scope, I have not. The API was something that I felt most certainly could not be hardcoded in, however.
Server Setup:
Spawn is protected by WorldGuard, and the map was created with WorldEdit. There was considerable effort put in as far as creating the activity area, and ensuring it was protected from unauthorized commands and block placement/destruction.
Project Challenges:
Because my setup was development on my Mac and hosting on a Windows desktop downstairs, I quickly realized how difficult it was managing my development environment vs the production environment. For example, my python script that called the OpenAI API worked perfectly fine on my Mac, but did not work at all on my PC. I had to make a change to the script to use Python’s ‘requests’ instead of ‘curl’ with ‘os.system’. This solved the issue, but cost me an hour and a half of my time.
Another issue I had was that, because I was running everything through a VPN (ISP provided router is difficult to port forward, and I need to make sure there aren’t any trackers when downloading my collection of Linux ISO’s) the actual host name resolution was a hurdle at times. While I could just directly connect, I preferred to route it through the “dallemc.dylan.sh” domain. The dynamic IP address the VPN uses means that I very often have to run a Powershell command to update my DNS records, which results in me having to wait for the DNS records to update on my Mac that I’m using to launch Minecraft and connect to the server with. If I was on Linux, I could just make it a CRON job, but unfortunately for the time being I’m still on Windows. Apparently, the subdomain i’m using might only work locally without the specified port, so I have to figure out if my SRV records are correct too.
While getting the plugin to execute the Python script, I spent over an hour trying to figure out why my Java code was incorrect. The script executed perfectly manually, but didn’t work when trying to execute it with the server. What I didn’t realize, was that I had coded the script to accept user input, not Java ProcessBuilder arguments, so all that time I had spent staring at my Java code could have been saved by focusing on my Python code.
MacroAssist was a project I worked on right before the end of my senior year of high school. It was created in Java and used JavaFX for the GUI aspect of it. This was new for me considering I came from using it’s predecessor, Java Swing, for my last project (El Localizador).
The goal was to create a program that would allow highly customizable programmable macros, so that one could theoretically use it for a video game or a task. At the time, I was playing a lot of Fortnite, so I thought that I could maybe automate building by doing so. Because of this, the original name was “Fortnite Friendo”.
MacroAssist’s GUI allowed for macros to be toggled and selected for on the fly. Macros are prewritten in a text file, using a special format that I created. You can see the sample file as “macros.txt” (MacroAssist automatically detects and parses using that filename), and it allowed for keyboard controls and mouse movements to be programmed in. For example, the line “mMove03000700 mPress mMove05000150” would move the mouse (mMove) to a certain location on screen, press down, and move to another location. This, at the time, was something that I believe was a bit uncommon, and it could theoretically also allow for automated software and hardware testing. For ease of use, MacroAssist would also note the user’s pointer location, so that it would be easier to write in.
Using JavaFX was something that was new for me, but it was considerably better and cleaner looking than my previous project. My choice of colors was a bit better this time, and this was a great project for me to end my senior year on.
MacroAssist still currently works, but requires Java 10 (obtainable through OpenJDK), as well as the now dependencies I included in the root directory of this project. I ran it recently, and the versions have been deprecated, but it still operates normally nonetheless. I guess this makes it technically cross-platform or universal since it was written entirely in Java.
Included below is a screenshot I just took of it, along with IntelliJ. Note the pointer location being printed below.
El Localizador (The Locator) was a project that I created in my senior year of high school. The goal was to create a program using Java and Java Swing that allowed the user to see all of the businesses within a radius they set, of a category that they select, and sort by either distance or rating. The rating was something that they would set themselves, it wasn’t advanced enough to import Google reviews or Yelp or anything. They could rate it out of 5 stars and write a short description of their experience should they ever visit it again. It would also show them the location of the establishment, but wouldn’t navigate or anything.
It geolocated the user’s location by figuring out the user’s IP address and calling an API (which still works, and I hardcoded in the API key so please don’t steal it for your own ripoff of a ripoff of Yelp!) that returned the general locaiton of the user. Obviously, this isn’t ideal, as for me it says I’m in Louisiana despite being in Texas, but it was for educational purposes anyway so that doesn’t matter too much. An interesting note is that it requests user consent before proceeding, a very progressive feature for late 2018.
Development:
The original class diagram.
Each establishment is created as an object using the ‘Establishment’ class, and the user’s input and variables are an object as the ‘User’ class. The ‘Database’ class actually handles the data, and is an object with an ArrayList of establishment objects. When the ‘User’ wants information, it calls the ‘Database’ class which uses it’s own methods to process the ArrayList of establishments. Each individual establishment has it’s own variables, getters, and setters, that provide the necessary information for the User.
There is a GUI class, that my adolescent self had named “GUIBaby”, which handles all of the visual aspects of the application. This is where most of the Java Swing comes into use, and the clas itself is an extension of the ‘Application’ class.
For the purpose of sorting, I have classes ‘SortByRating’ and ‘SortByDistance’ that implements ‘Comparator’, the Java interface for sorting items without intrinsic order. These essentially are just used to compare distance or rating for establishments.
There are also tester classes (‘DatabaseTester’, ‘EstablishmentTester’, ‘UserTester’, etc.) that serve the purpose of testing the various other classes to see if they individually work.
Current Status:
El Localizador is spoken of in the past tense, because unfortunately the fact that it was written in Java 10 and uses Java Swing (successed by JavaFX) has caused it to be a bit buggy and difficult to get working. I attempted to revive it recently by installing the OpenJDK version of Java 10 and integrating Maven to fix an API JSON bug, but unfortunately it still does not load properly. I’m sure with enough time and effort I could bring it back, but given the time and effort that would take I unfortunately feel the sun has set on that gray and turqouise backdrop forever.
When I was in high school my computer science teacher assigned us a project where we had to create a website to showcase ourselves and our work, dubbed an “e-portfolio”.
Whereas others had created simple websites with their name and some of their class projects, I had taken the more grandiose approach and wanted a website that looked a bit better.
I decided to modify a template and hosted it using Github Pages. Using a domain I purchased off namecheap, I created some CNAME and A records and pointed it to Github’s servers. I modified the HTML and CSS for the template and was all set.
I left it as is for a while, but at this point it’s been a few years now and I realized that my website needed an update. It’s outdated and has information from back when I was in high school. Time for a fresh coat of paint.
The first thing I wanted to do is change the domain name. I currently own “dylangarcia.me”, “dylanjcgarcia.com”, and “dylangarcia.rocks” , which are all great but I felt that I could do better. I really wanted a domain name that was just my name but unfortunately someone took “dylan.com” back in 1995 and I don’t have a time machine yet. “dylan.rocks” would’ve been my next choice but unfortunately the .rocks TLD hates Dylan’s and decided to make it a $3000 premium domain. I considered purchasing it but I’ve run out of kidney’s to sell so I settled on “dylan.sh”, which I like because ‘.sh’ is the linux shell script file extension and I’ve always been a fan of British overseas territories.
I updated all of the information by modifying the HTML in my github repo. It isn’t too much work because it’s just changing the text. I also changed some of the icons and colors just to make it a bit more refined.
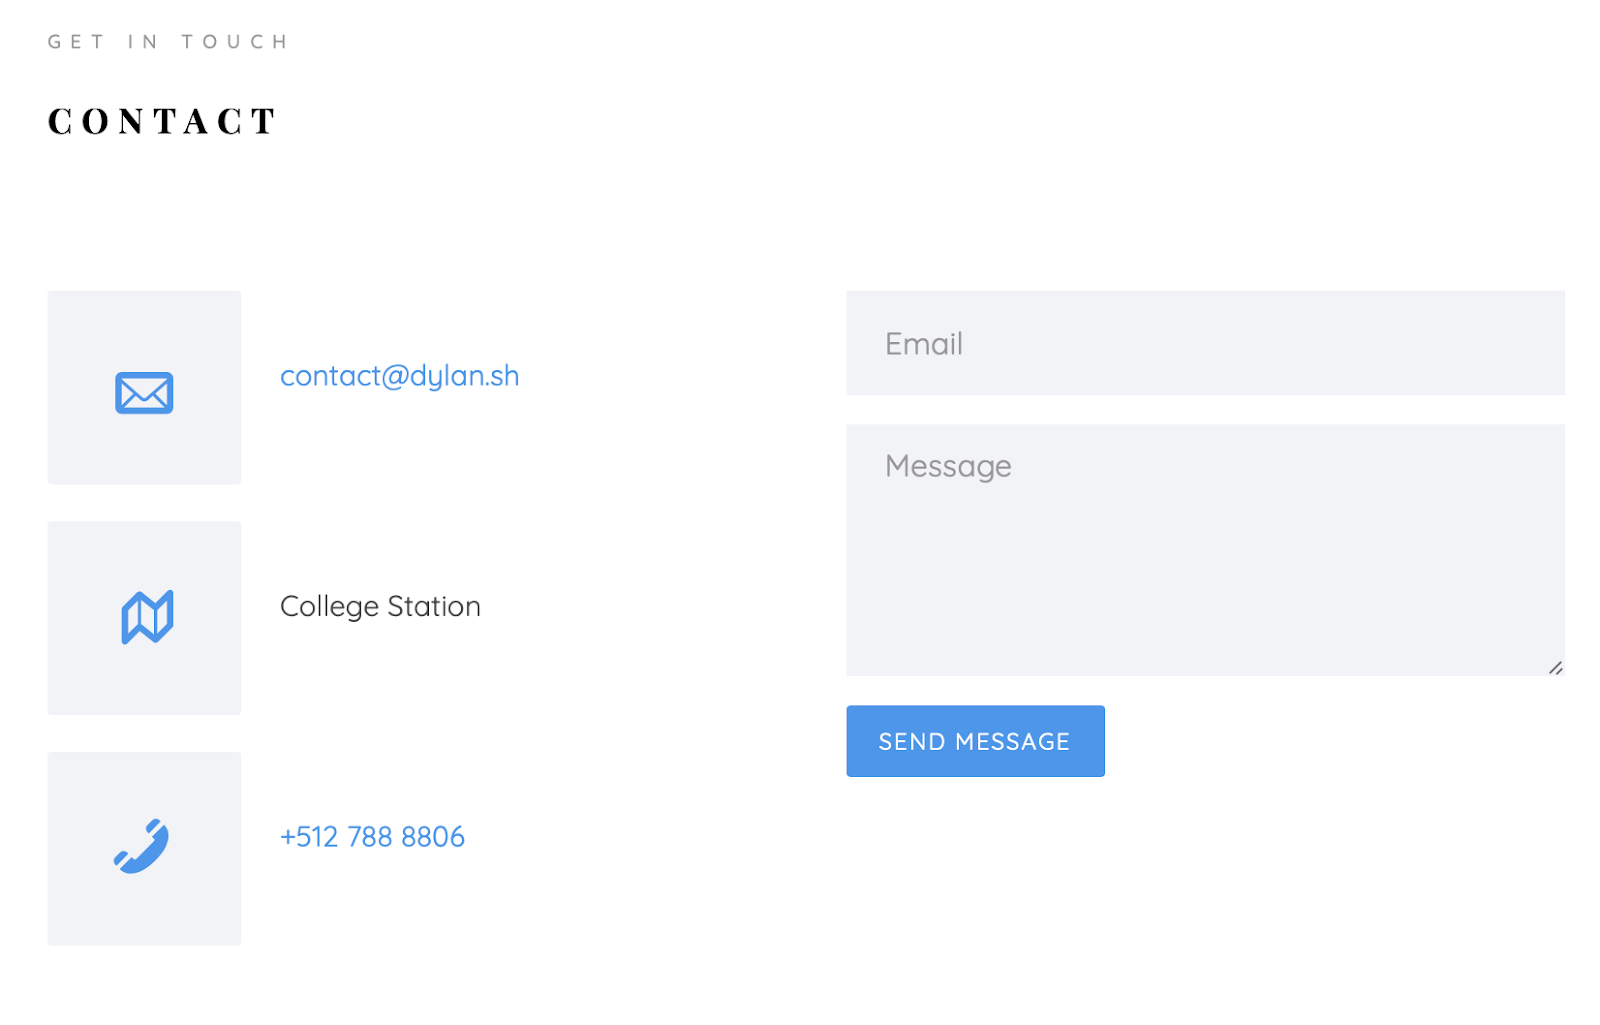
At the bottom of the website there’s a “contact” section. The submission section has been broken for a while so it needs to be updated. Because Github Pages only allows for static HTML/CSS/JS, I have to use an external service to accept submissions. I could just use the standard mailto: field but I’d prefer to have the submission section because it feels just a bit more polished.
I used formspree to do this and it allows a message as well as a reply email. I had to modify the form to post to a formspree.io link with an email and message field. Works fine so feel free to try it yourself with a job offer and your company email.
Because my domain is pretty short I decided that I’d like to throw in a URL shortener just for fun. Like I said previously though, Github Pages is static only and I’d rather not build out a whole huge backend so I have it call an API for short.io that I whitelabel with my own domain so that it looks nice but I’m really just a fraud.
I added a textbox for inputting your URL and a button to submit it for shortening. Because they’re slightly different than the other ones I had to add additional CSS for them but that was pretty simple.
I added the script that short.io provides and modified it a bit since it didn’t work exactly right and it didn’t return a hyperlink result. Now whenever I have to send a link to someone I can shorten it to flex my domain name I paid $60 for in a namecheap auction.
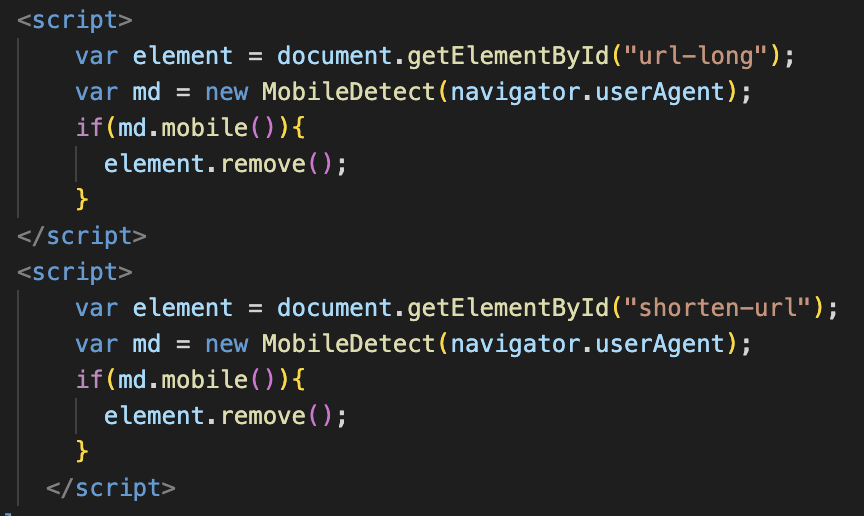
For my final trick I opened the site on mobile and realized it was poorly optimized and decided to write a script that removes the URL shortener if viewed on mobile because I figured that’s what was giving me the error I observed.
It uses the “mobile-detect” library to check if a user is on mobile. I had to include the library first and then create a “MobileDetect” object and call the “mobile()” method to check. While this was successful at removing the shortener, the error still occurred so I guess I have to fix that at some point.
For the blog I considered writing it from scratch but decided I’d rather not have it look like Amazon from the 90’s. I picked out a jekyll theme because Github Pages seems to like it and they tend to use a standard MIT license so I can modify it to my heart’s content. I picked Celeste because it looked nice and I liked the way it has a wave when you hover over the ‘d’ at the top. I modified some things like adding my LinkedIn and Github as well as my vanity email (contact@dylan.sh), and replaced the text with my own. Because capybaras are my favorite animal I decided to ask DALLE to make me some capybaras (be sure to see what happens when you 404 the site).
Anywho, now everything is up and running so I have to fill it with posts. Honestly this is mostly just a test blog post to see how everything works out. The goal from here is to link it with my main page so that posts automatically populate on the site. Hopefully this goes well or else I wasted good coffee for nothing. Stay tuned!
Update: I forgot I also have to fix the blog section. Because I only have one post it’s still going to look pretty bad but whatever, I just want it to be somewhat usable.
My initial objective was to pull markdown metadata from blog.dylan.sh and use that for the blog section in dylan.sh, but I quickly realized that there would be an issue with doing that. Because Github Pages is static only, and blog.dylan.sh and dylan.sh are different repos and different domains, it would violate the Same-origin policy and browsers wouldn’t allow it. I couldn’t even configure CORS (Cross-Origin Resource Sharing) to allow it, because it’s static and I don’t have the ability to add headers to HTTP responses. This means I would have to either have a proxy server that handles it, or I could potentially make a script for it.
I wanted to avoid the server route because my current main server is just my old gaming desktop and unfortunately it currently runs Windows and the updates kill it every few weeks (I have all my drives fully encrypted and Windows doesn’t just boot up like normal since it gets hung on the Veracrypt bootloader screen).
My second attempt was to just write a python script and assign a CRON job on my laptop (MacOS) so that it would automatically push a .json file to my personal website repo during the day when I’m using it. The overhead for this wouldn’t be too high and because I have “Wake for network access” set to only on power adapter, it wouldn’t wake from sleep to perform the job (unlike S3 sleep for Windows Modern Standby) so my battery wouldn’t be randomly drained.
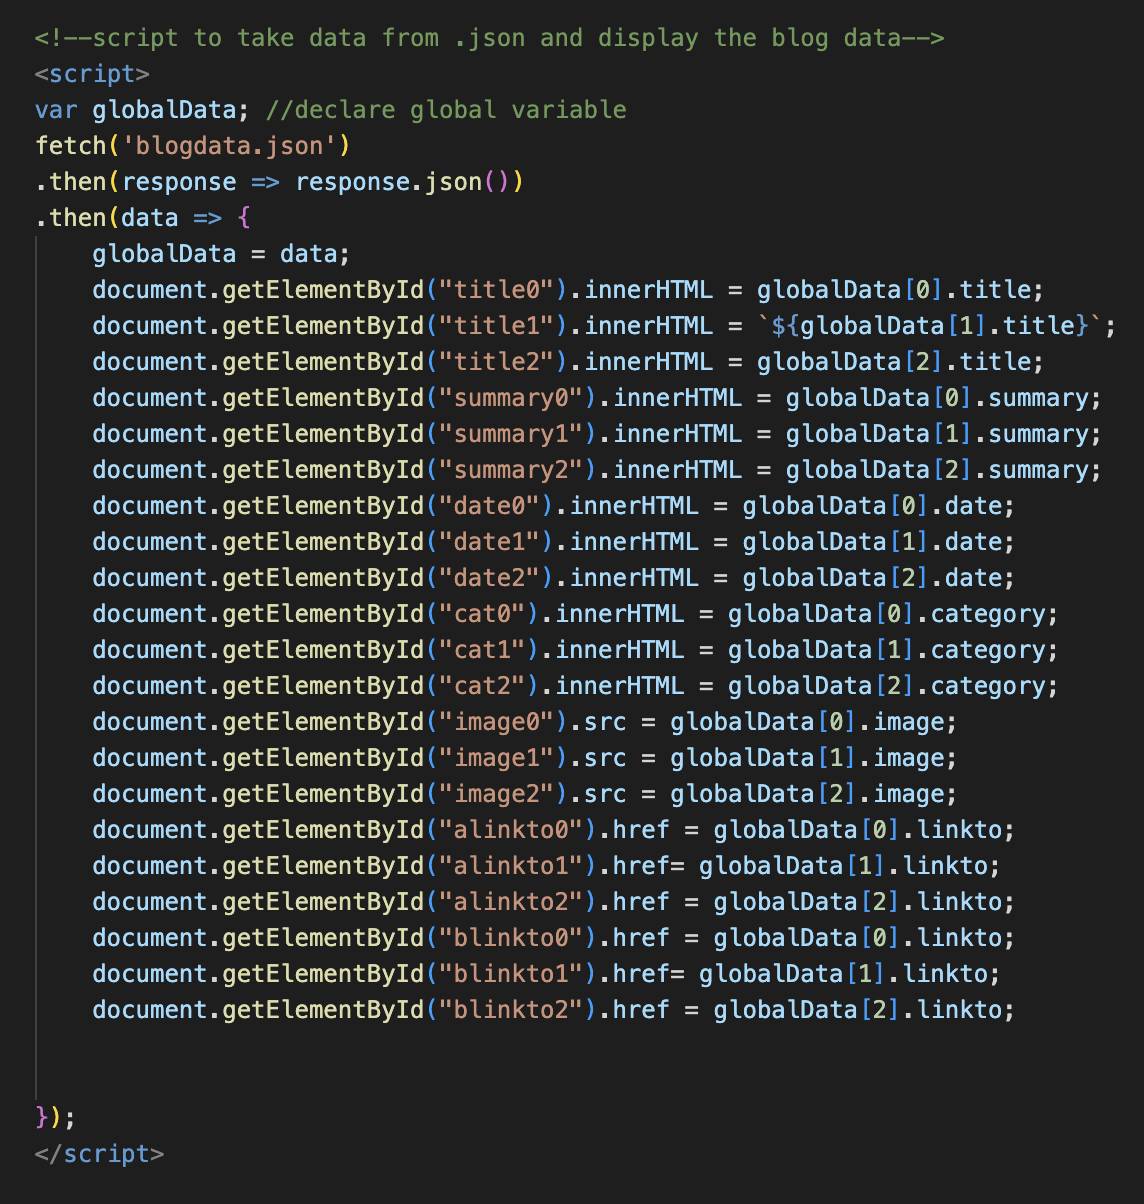
However, I put this idea on the backburner for another day and decided to just put a .json in the repo that I’ll manually enter the details for every time I make a post. For now I just wrote a small script to take input from the .json file and give it variables for the blog section of my website to access.
Update (1/13/22): I forgot I also have to fix the blog section. Because I only have one post it’s still going to look pretty bad but whatever, I just want it to be somewhat usable.
My initial objective was to pull markdown metadata from blog.dylan.sh and use that for the blog section in dylan.sh, but I quickly realized that there would be an issue with doing that. Because Github Pages is static only, and blog.dylan.sh and dylan.sh are different repos and different domains, it would violate the Same-origin policy and browsers wouldn’t allow it. I couldn’t even configure CORS (Cross-Origin Resource Sharing) to allow it, because it’s static and I don’t have the ability to add headers to HTTP responses. This means I would have to either have a proxy server that handles it, or I could potentially make a script for it.
I wanted to avoid the server route because my current main server is just my old gaming desktop and unfortunately it currently runs Windows and the updates kill it every few weeks (I have all my drives fully encrypted and Windows doesn’t just boot up like normal since it gets hung on the Veracrypt bootloader screen).
My second attempt was to just write a python script and assign a CRON job on my laptop (MacOS) so that it would automatically push a .json file to my personal website repo during the day when I’m using it. The overhead for this wouldn’t be too high and because I have “Wake for network access” set to only on power adapter, it wouldn’t wake from sleep to perform the job (unlike S0 sleep for Windows Modern Standby) so my battery wouldn’t be randomly drained.
However, I put this idea on the backburner for another day and decided to just put a .json in the repo that I’ll manually enter the details for every time I make a post. For now I just wrote a small script to take input from the .json file and give it variables for the blog section of my website to access.
Certainly not the most elegant solution but it gets the job done so I can move on to other things for now.
 Click the image for a YouTube demonstration